How to set up art for your corrugated POP display
This is it! You’re preparing artwork for your very first corrugated POP display, but you need a few pointers to make sure everything is done properly. We’re here to help, so let’s get started…
Once your design has been finalized and you are ready to start preparing artwork, we will send you the dieline templates for any components that need to be printed. The dielines will be sent to you in Adobe Illustrator EPS format at full size (figure 1).
The die template can be opened in Adobe Illustrator, and if you plan to lay out your artwork in Illustrator, you can start working on it here. Just be sure to create a new layer for your artwork to keep it separated from the dielines. If you plan to prepare your artwork in Photoshop, you will need to copy the dieline and paste it into Photoshop. If the template is large, you may want to reduce the template to 50% scale before copying it to keep your Photoshop file from becoming too bloated. In Illustrator with the black arrow tool selected, click Cmd+A (Ctrl+A on PC) to select all the lines. Deselect any measurements in the document by holding shift and clicking on them. You won’t be needing them in Photoshop and including them will make your Photoshop document larger than needed. Once all the necessary lines have been selected, Click Object > Transform > Scale and set the scale to 50% (figure 2). Now click Cmd+C (Ctrl+C on PC) to copy the lines. If the template isn’t extremely large, or if you prefer to work at 100% scale then don’t bother reducing the template to 50%.
Open Photoshop and create a new document by clicking File > New. The new file dialogue window will open and ask you what size you would like the document to be. Since you copied the template in Illustrator, the new document should automatically be set to the size of the path in the clipboard. Set the colour mode to CMYK, but don’t adjust anything else even if the resolution is set too low (figure 3). Click OK and the new document will open. Now paste the template that we copied from Illustrator into the new Photoshop document by clicking Cmd+V (Ctrl+V on PC) and select Path from the Paste dialogue box (figure 4). The path can be found on the paths tab of the layers pallet, and it should fill the entire document. It should be centered perfectly in the document, but you may need to select all the paths with the black arrow tool then nudge them with the arrow keys on your keyboard to make the edges of the dieline line up with the edges of your Photoshop document.
The next step is very important! In Photoshop click on Image > Image Size and set the Resolution to 300 pixels/inch then click OK (figure 5). If you set the resolution lower than this when setting up your artwork at half size, some elements may not appear as crisp as they could be when printing at full size.
There is one more thing that needs to be done before you start creating your art. We need to leave room for bleed outside of the template edges. To add space for ¼” (6mm) of bleed we will need to increase the slze of the canvas by ¼” (6mm) if you are setting up the art at 50% scale, or ½” (12mm) if you are setting it up at full size. Click Image > Canvas Size and add the desired amount of space to both the width and height, then click OK (figure 6). The canvas should now have space for bleed on all four sides of the document (figure 7).
Create your artwork inside the confines of the die templates. Some pieces like header cards, or standees may have room to change the shape of the die cut to follow your art. Check with your rep to make sure that will be okay before adjusting any die lines, and be sure to inform us of any changes that you may have made. To change the shape of the die cut, head over to the paths tab on the layers pallet and use the pen tool to follow the shape of your art. You can do this on the same path layer that the die template is on. Check out our blog post on adding bleed to die cut images for tips if you will be cutting around textured objects.
Now that your art is complete click File > Save As and navigate to the folder where you will be saving all the elements for your project. Create a new folder if necessary and give it a meaningful name in case you ever need to find it again at a later date. Inside this folder create a new folder named images, and save all images here. Even if you will only be linking to one image in your layout, it’s always best to place it in an images folder to reduce any confusion on our end. Now, what type of file should you save it as? If you don’t have a lot of layers and the native .psd file isn’t too large then it’s fine to save that original file into the images folder and use it in your layout. If you have a lot of layers and high resolution elements in your file then that file will be huge. It’s going to slow down your workflow and it will take us extra time to work with on our end. In this situation, it’s best to save your original psd file with all the layers in your main project folder, but don’t send it to us with your art for printing. Instead of sending us the massive layered file, go back into Photoshop and click Layer > Merge Visible. This will put all of your elements onto one layer while preserving any transparency in your image. Click File > Save as, and give the file a new name or add flat to the end of the file name so that you don’t accidentally save over your original layered file. If you won’t require transparency in your layout and you want a very small file, you can save your image in eps format with jpeg (maximum quality) encoding. The EPS file format is no longer receiving updates, but it can still be used for printing high quality images from a very small file size.
Now that your Photoshop file (with bleed) has been saved you have a couple options. If you don’t need to add any other elements to your art layout and you placed the dieline on a path dieline, you can send us that file and we will prepare it for print. If you have more elements to add, like text, logos, or other raster images, you can move back to the Adobe Illustrator dieline file we sent you and start setting up your art there.
In Adobe Illustrator, if you shrank the dieline down to 50% before copying it over to Photoshop, be sure to undo or scale the dieline back up to full size. Name the layer containing the dieline, and create a new layer named artwork and drag it underneath the dieline layer (figure 8). You can place your Photoshop file on the artwork layer by selecting the artwork layer and clicking File > Place, then navigating to the Photoshop file that you saved into the images folder (figure 9). If you created your image at half size, select the image then click Object > Transform > Scale and set the scale to uniform – 200% then click Ok (figure 10). Position your artwork so that it lines up with the dieline. If you included ¼” of bleed in your image, turn on the rulers by clicking Cmd+R (Ctrl+R on PC), then click and drag from the empty square in the top left corner of your window, and release on the edge of your dieline. This will zero the ruler at the edge of your dieline. Now you can click and drag from the ruler at the side or top of the window over to the ¼” mark and release a guide line. Use the guide lines to position your placed image in the correct spot (figure 11). Add any additional elements to your artwork and you are all done (figure 12)! Save the file outside of the images folder, and be sure to include any fonts you have used in your layout by clicking File > Package to collect the fonts and save them into the folder you are working in.
That’s it! Your file is now ready to print. Compress your files and let us know that they are ready. We will send you the login information for our ftp site, or we can retrieve the art from your site. Please feel free to contact us if you have any questions or need help setting up your art.

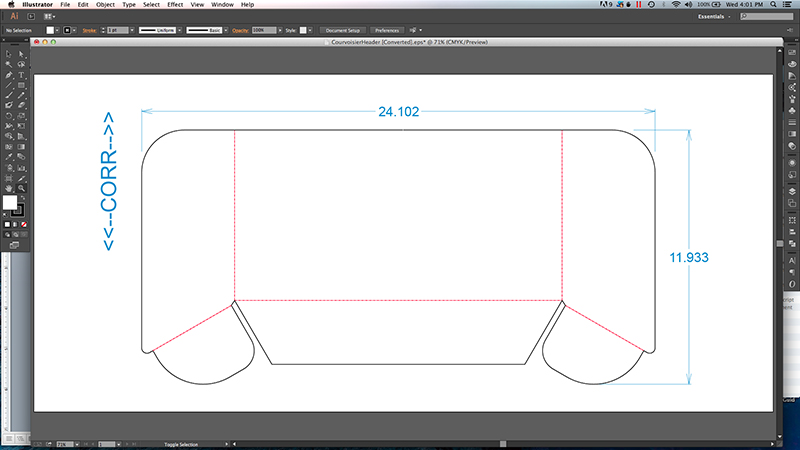
figure 1
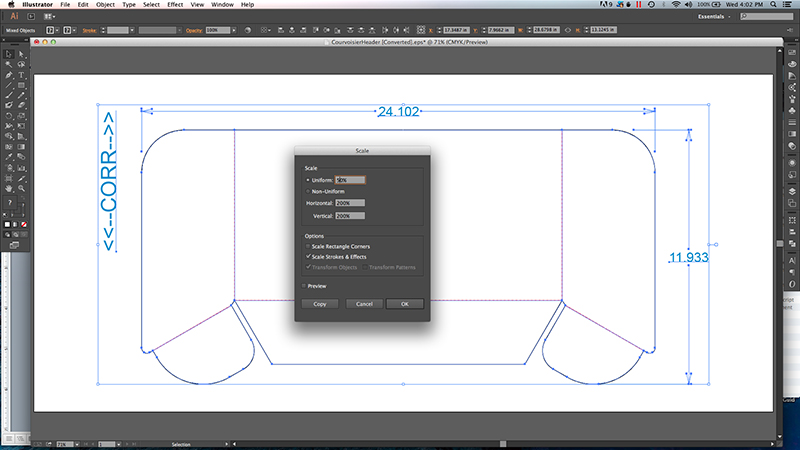
figure 2
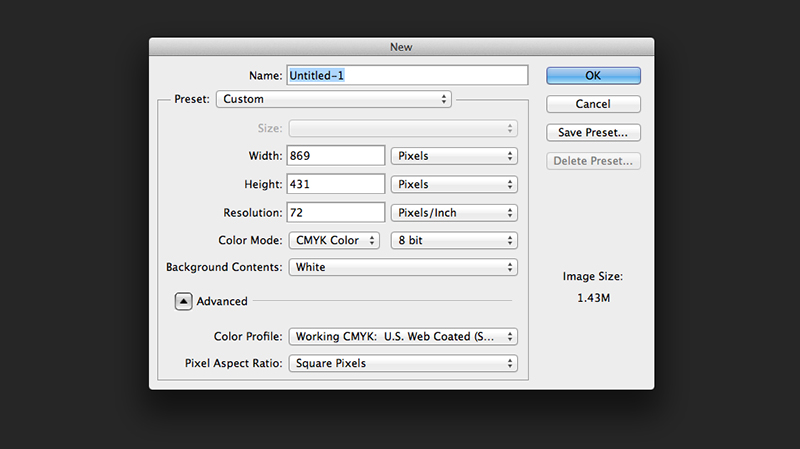
figure 3
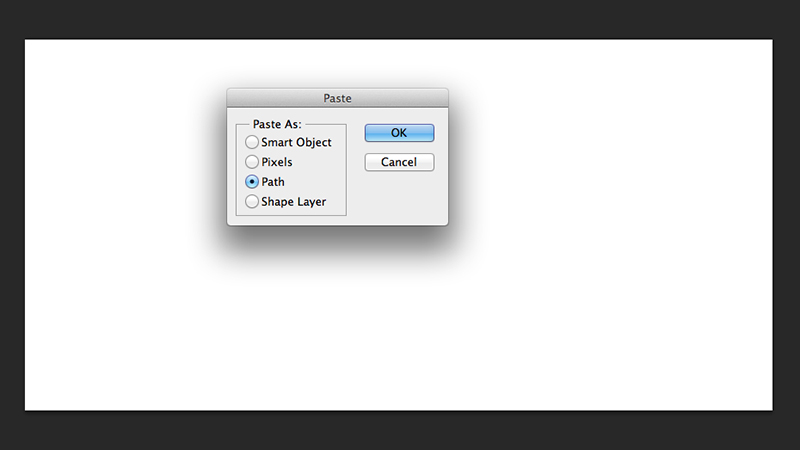
figure 4
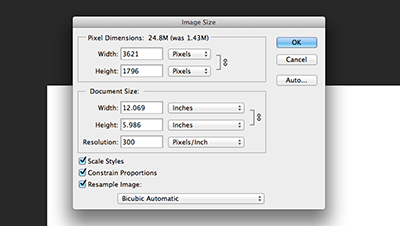
figure 5
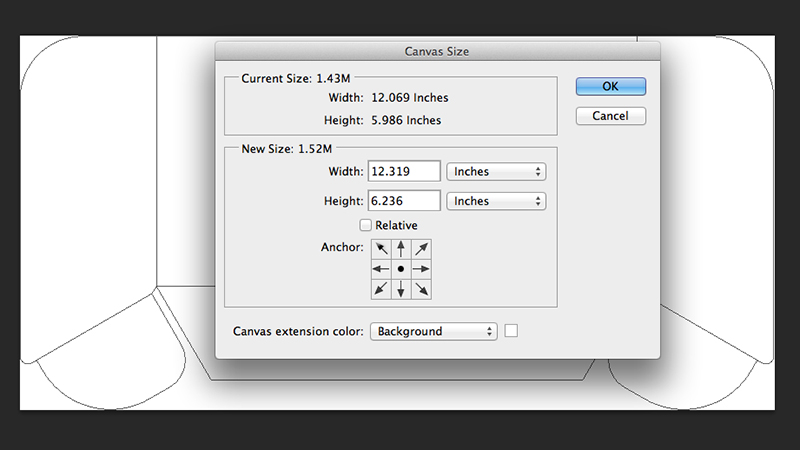
figure 6

figure 7
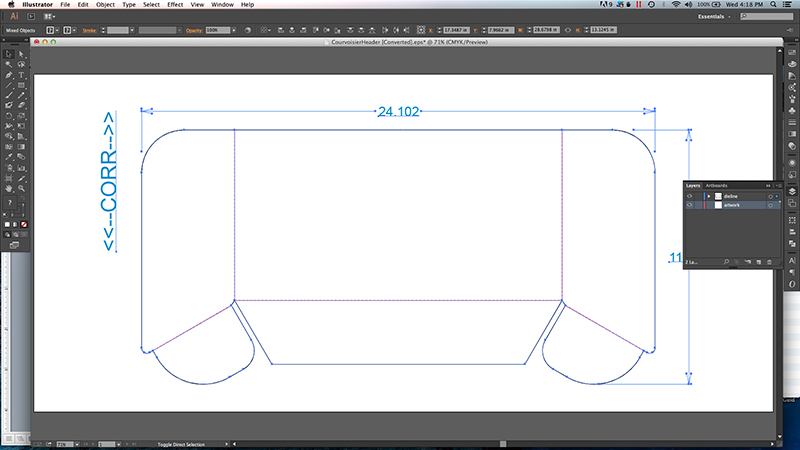
figure 8
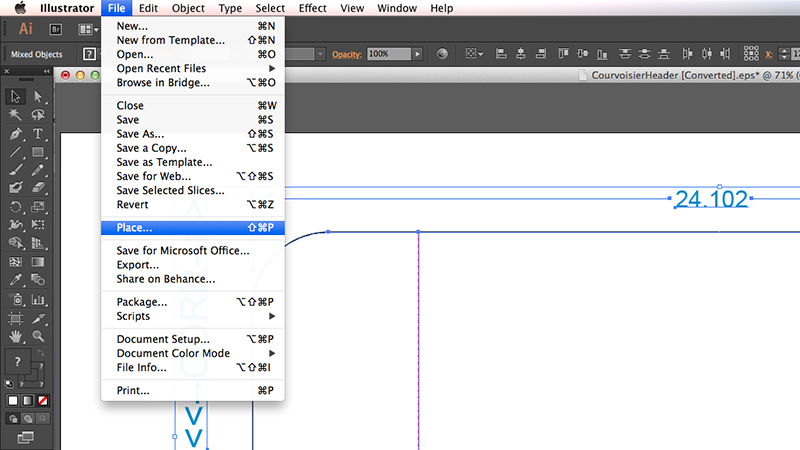
figure 9
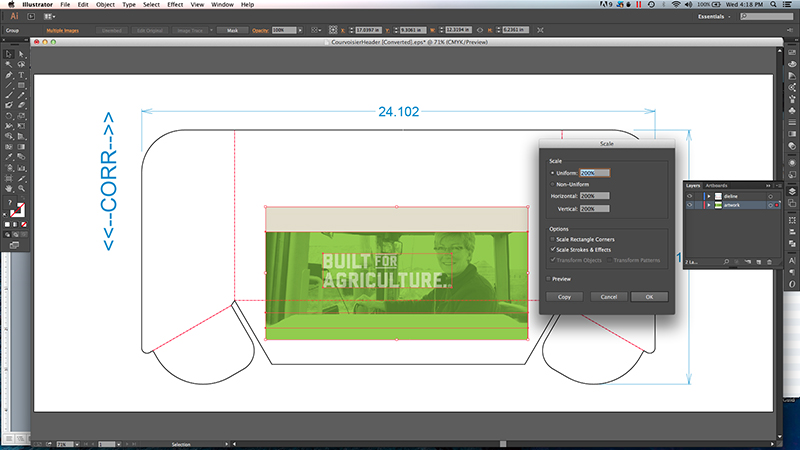
figure 10

figure 11
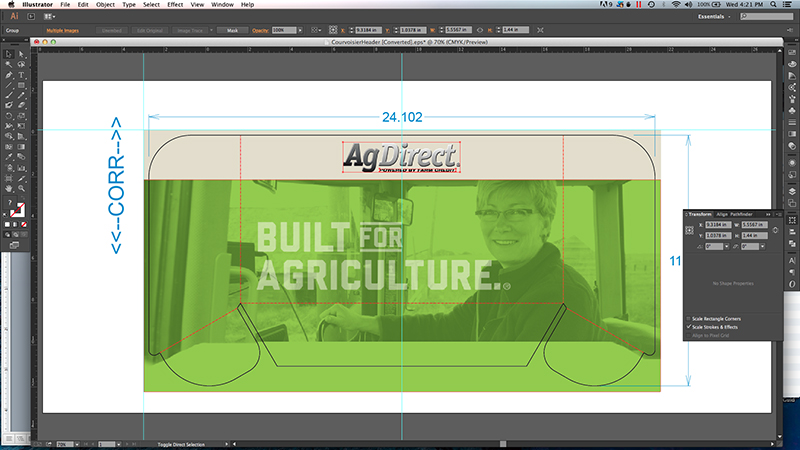
figure 12
Leave A Comment